
Aloha
Instructions for integrating your Aloha POS with Vēmos Pay
- Open a browser on your back of house Aloha computer and go to https://connect.omnivore.io/invite/VEMOS
- Click “Download”
- Open/run the program (Omnivore)
- Fill out the form with your venue’s information
- Give Vemos access
Micros
Instructions for integrating your Micros POS with Vēmos Pay
- Open a browser on your back of house Micros computer and go to https://connect.omnivore.io/invite/VEMOS
- Click “Download”
- Open/run the program (Omnivore)
- Fill out the form with your venue’s information
- Give Vemos access
Positouch
Instructions for integrating your Positouch POS with Vēmos Pay
- Open a browser on your back of house Positouch computer and go to https://connect.omnivore.io/invite/VEMOS
- Click “Download”
- Open/run the program (Omnivore)
- Fill out the form with your venue’s information
- Give Vemos access
Dinerware
Instructions for integrating your Dinerware POS with Vēmos Pay
- Open a browser on your back of house Dinerware computer and go to https://connect.omnivore.io/invite/VEMOS
- Click “Download”
- Open/run the program (Omnivore)
- Fill out the form with your venue’s information
- Give Vemos access
Upserve by Lightspeed
Instructions for integrating your Upserve POS with Vēmos Pay
- Step 1
Login to your Upserve HQ at https://hq.upserve.com.
- Step 2
Select “Integration Partners” in the left navigation/menu. (It is located under ‘Settings’)

- Step 3
Click the button “Add API Partner” then search “Vemos” and select.
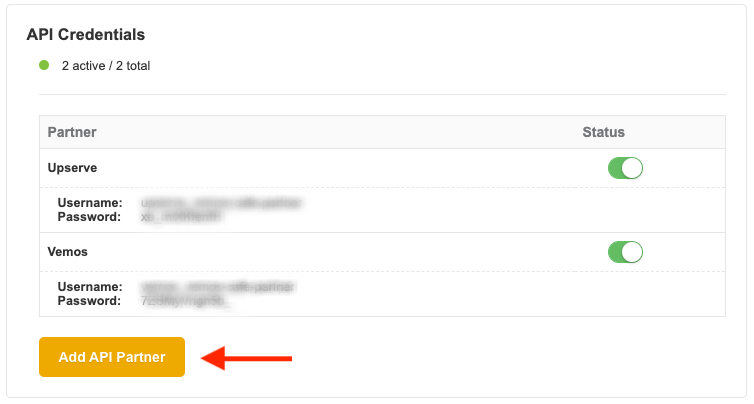
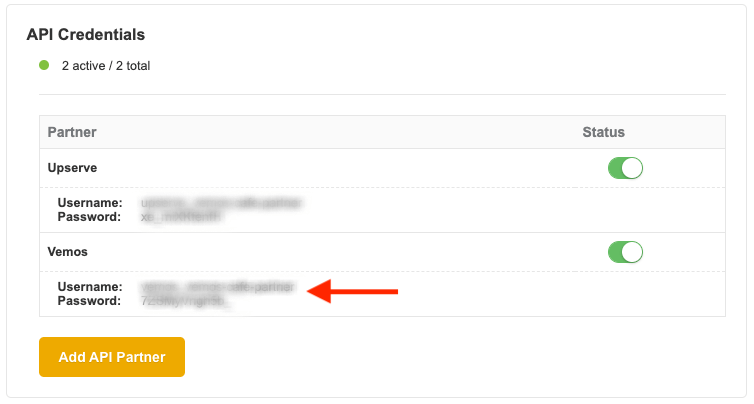
- Step 4
Copy & paste the auto-generated “Username” and “Password” that appears under “Vemos” in the “Partner” section and email it to upserve@vemos.io.
- Step 5
Complete your free Vēmos account setup at https://app.vemos.io/easy-setup/vemospay.
- Step 6
Connect Upserve processing:
Email your Merchant ID to upserve@vemos.io and a Vemos team member will connect your Upserve processing account so all your Vemos Pay transactions will be processed through your Upserve processing account. You will find your Merchant ID on the bottom left corner of your Upserve HQ dashboard.

- Congrats – You’re set up!That’s it. After completing these steps, you’re connected and set up to accept Vēmos Pay. Email integrations@vemos.io to have our customer success team set you up with our complimentary signage and support your venue’s success!
Toast
Instructions for integrating your Toast POS with Vēmos Pay
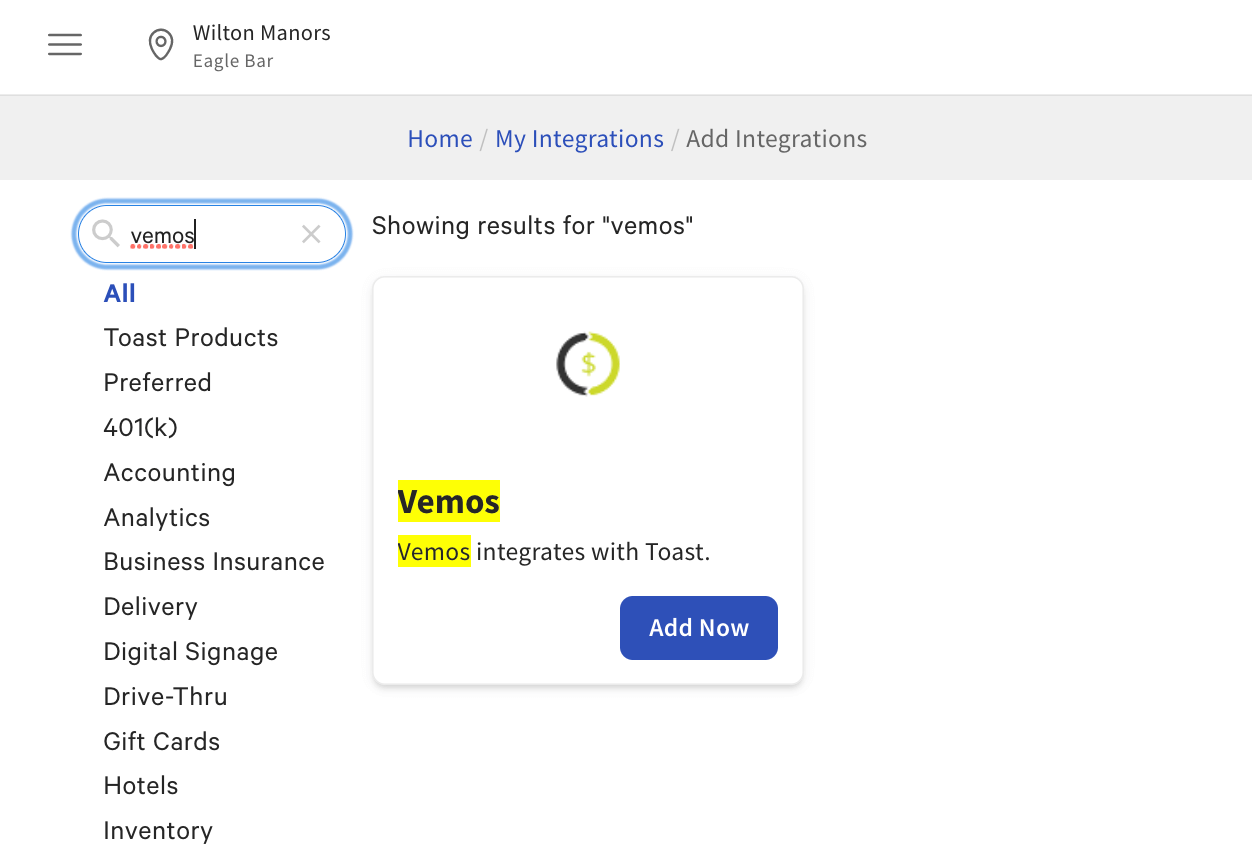
- Step 1Add “Vemos” in the Toast Partner Connect Portal.Please login to your Toast backend and head to this page: https://www.toasttab.com/restaurants/admin/integrations/add-integrations.
Then, search Vemos and click Add Now
- Step 2Create a “Vemos Pay” employee in Toast. We recommend this employee have “1.17 Change Server” permission enabled so your staff can easily transfer checks created by Vemos Pay to themselves.
- Step 3Complete your free Vēmos account setup here if you don’t have an account already. If you do already have a Vēmos account, you can skip this step.
- Congrats – You’re set up!That’s it. After completing these steps, you’re connected and set up to accept Vēmos Pay. Please note that it may take up to 72 hours for Vēmos Pay to be fully live in your Toast terminal. Don’t forget to email integrations@vemos.io to have our customer success team set you up with our complimentary signage and support your venue’s success!
Square
Instructions for integrating your Square POS with Vēmos Pay
- Step 1Create your free Vēmos account here if you don’t have an account already. After signing up, check your email for a link to set your password. Once your password is set, log into your Vēmos accountusing your new credentials.
- Step 2Inside your Vēmos account, go to Settings > Venue > Integrations.
- Step 3Click the green “Connect” button next to Square to connect your POS.Make sure you are logged into your Square account.
- Step 4Follow the prompted steps from Square. At the end, select your location and copy/paste the URL and email it to square@vemos.io.
- Step 5Connect your Stripe account from your Vēmos dashboard. You can click ‘Events & Tickets’ from the left nav bar then connect your Stripe account (or sign up for one if you don’t have one already).
- Congrats – You’re set up!That’s it. After completing these steps, you’re connected and set up to accept Vēmos Pay. Email integrations@vemos.io to have our customer success team set you up with our complimentary signage and support your venue’s success!
Clover
Instructions for integrating your Clover POS with Vēmos Pay
- Step 1Create your free Vēmos account here if you don’t have an account already. After signing up, check your email for a link to set your password. Once your password is set, log into your Vēmos accountusing your new credentials.
- Step 2Inside your Vēmos account, go to Settings > Venue > Integrations.
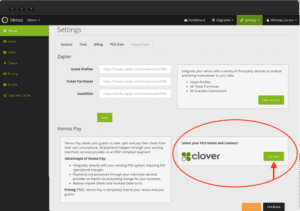
- Step 3Click the green “Connect” button next to Clover to connect your POS. This will take you to our Clover app inside the Clover App Market. Make sure you are logged into your Clover account.
- Step 4On our Clover App page inside your Clover POS account, click the “Connect” button to initiate the installation process. Follow the prompted steps from Clover.
- Congrats – You’re set up!That’s it. After completing these steps, you’re connected and set up to accept Vēmos Pay. Email integrations@vemos.io to have our customer success team set you up with our complimentary signage and support your venue’s success!
Harbortouch
Instructions for integrating your Harbortouch POS with Vēmos Pay
- Open a browser on your back of house Harbortouch computer (also called “The Brain”) and go to https://connect.omnivore.io/invite/VEMOS
- Click “Download”
- Open/run the program (Omnivore)
- Fill out the form with your venue’s information
- If prompted to select your POS, please select “Dinerware”
- Give Vemos access
- If prompted to schedule an installation, please select a date/time you are available
Squirrel
Instructions for integrating your Squirrel POS with Vēmos Pay
- Open a browser on your back of house Squirrel computer and go to https://connect.omnivore.io/invite/VEMOS
- Click “Download”
- Open/run the program (Omnivore)
- Fill out the form with your venue’s information
- Give Vemos access
Par/Brink POS
Instructions for integrating your Brink POS with Vēmos Pay
- Open a browser on your back of house Positouch computer and go to https://connect.omnivore.io/invite/VEMOS
- Click “Download”
- Open/run the program (Omnivore)
- Fill out the form with your venue’s information
- Give Vemos access
Agilysys InfoGenesis
Instructions for integrating your InfoGenesis POS with Vēmos Pay
- Open a browser on your back of house InfoGenesis computer and go to https://connect.omnivore.io/invite/VEMOS
- Click “Download”
- Open/run the program (Omnivore)
- Fill out the form with your venue’s information
- Give Vemos access